Things I Have Learned This Year
These practical skills I have learnt this year on Ableton Live. I have used these skills to help me make better tracks and make my tracks sound more clean, loud and like a legitimate song that you would hear on the radio.
Parallel Compression
This technique was taught by our tutor Andy in a lesson in the year. It’s basically a way to make your drums sound loud and clean but however to the extent so it won’t clip 0db, and won’t distort. The way to do it is by sending the drums through a bus or in my case, a “group” in Ableton Live. Running them through an operator and Eqing, side-chaining and many limiters. Also using a Multi Band Dynamics, to boost the drums a little bit more, however the limiter is stopping this to boost overboard but still sounding loud and clean.
I researched this into a little bit more detail and found a few things that helped me remember to explain a few things. Also helped me understand it in further detail. I found out two different types of ways to explain it. These are, Downward Compression and Upward Compression.
- “Downward compression – reduces a signal above a set threshold (squashes loud parts down)”
- “Upward compression – raises the signal below a set threshold (squashes the quieter parts up.)”
I got these quotes from:
(Studio Slave, 2019)
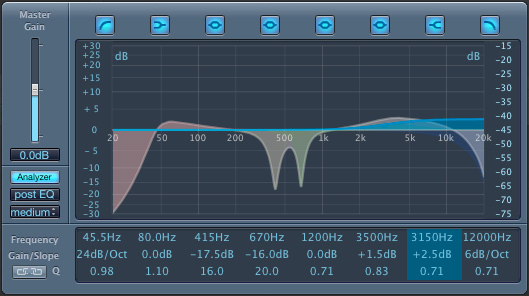
EQ
I use EQ in my everyday producing when I make tracks. This helps make the track sound more clean and reduced the over lapping of different sounds and cut certain frequencies. I did some research on the overall frequencies. Basically explaining what the main parts of the EQ is used for.
Sub Bass – Sub Bass ranges from 20Hz to approximately 60Hz. This just gives a nice sub sounds that isn’t too overpowering but isn’t too weak.
Bass – Bass ranges from 60Hz to approximately 250Hz. To reduce the strength of the bass so it isn’t too much.
Low Mids – Low Mids range from 250Hz to approximately 1500Hz. To cut down the clashing of the other sounds but still creating a good atmosphere for the sound.
High Mids – High Mids range from 1500Hz to approximately 4kHz. To produce the punch for your Kicks and percussion. But mainly for the Synths and the main lead of the track. Finding the right frequency range to make the sound cleaner and more powerful.
Presence – Presence ranges from 4kHz to approximately 7kHz. To boost the sounds in the mix that don’t get picked up. But too much, can but hurtful to the ear.
Brilliance/Noise – Brilliance/Noise ranges from 7kHz to 20kHz. This parts cuts the highest frequencies to reduce the damage to peoples ears. Also to allow breathing space but if there is too much, there will be a lot of high pitch sounds that do not sound great to the ear!
I found this information on:
(Meijer, 2018)
Sidechain Compression
Side chaining is very crucial when you are making a track, it shows a lot of knowledge too if you know what you are doing and your doing it correctly. It can play a big part of your track and is very important as it can change the sound of it, once you’ve got the ear to listen to it a hear the little changes. The best way to put it,
“Is to use a sidechain compressor to let the kick drum to punch a little hole right through a bassline. To do this, simply insert your compressor on the bass, and use a bus to send your kick drum signal into the sidechain input.”
(Colletti, 2013)
Which basically means you would sidechain your kick to your bass so it does not punch through your baseline. So letting your kick groove with your bass. So it isn’t overlapping and sounds nasty to the ear. Because it can sound very messy without sidechain compression, but can also sound nasty if it isn’t used correctly. You can also use sidechain on over instruments. For example, your Hi-Hats and Kicks. You would sidechain the hats to the kick, so the hats would fill in the gaps and flow more nicely with your kick, coming up when there is space, but the kick would lower the volume to it would clash less.
Mixdown
The mixdown is what everyone uses when they make a track, some people do it at the end, some people do It as they go. Either way it is very important to mix down. A mix down is basically when the track is mix down, individually (each instrument) and balanced out equally so it has a lot of room to boost when the master is taking place. You do this just by lowering the volume of the tracks. I usually mixdown to -6db, so there is still a fair amount to boost, so it sounds loud and clean but also does not clip and distort.
Some information to back this is some research I did on:
“A mixdown is the process in which you finalize your tracks, and prepare them for mastering. A good mixdown can truly make or break a track, and be the difference between a track being signed or not.”
(Nolan, 2019)

